Primavera P6 is a powerful scheduling tool, but its true potential lies in how you set up your workspace. The way your columns, layouts, and timescales are configured can make a big difference in how clearly you view, analyze, and manage your project data.
Whether you’re tracking baseline variance, updating progress, or reviewing resource assignments, having the right layout saves time and reduces confusion. The best part? Primavera P6 allows you to fully customize these views to match the needs of your team or reporting style.
In this guide, you’ll learn how to set up columns to display key project fields, create and manage custom layouts, and adjust the timescale for better timeline visibility. Each step is designed to help you personalize your workspace and make Primavera P6 more intuitive to use, especially during daily schedule reviews and reporting cycles.
Watch Video Instead
Watch our detailed video tutorial on How to Set Up Columns, Layouts, and Timescales in Primavera P6
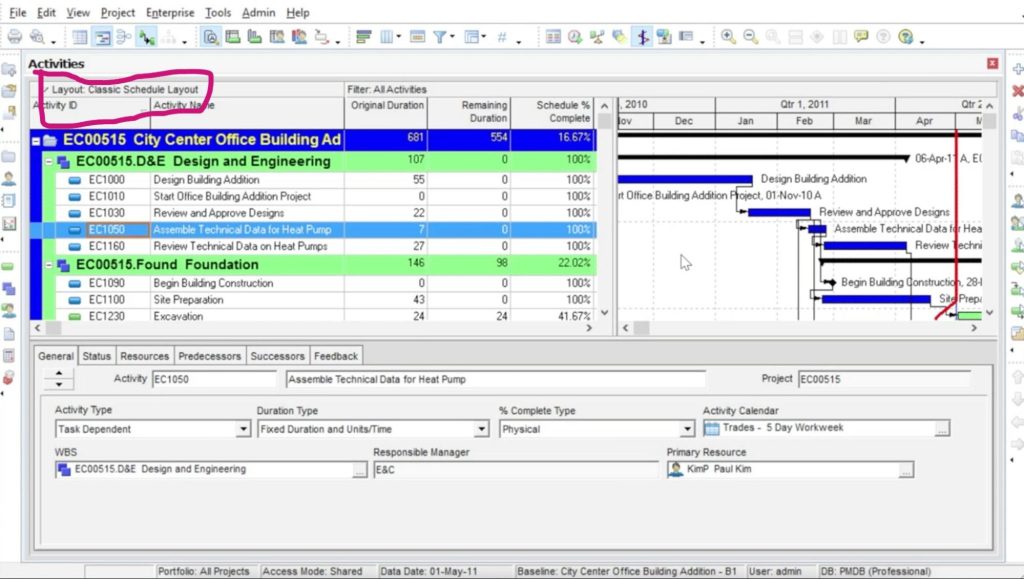
Step 1: Opening Layouts in Primavera P6
Primavera P6 comes with a range of built-in layout options — and if you’re working in a shared environment, you may also see layouts created by other users or administrators. These layouts help standardize how data is viewed across projects and teams.
To explore and open available layouts, go to the top menu and select:
Layout > Layout > Open
Keep in mind: the layouts shown are context-specific. If you open the Layout menu from the Activities screen, you’ll only see layouts related to Activities. The same goes for Projects, WBS, and other screens — each has its own layout type.
To apply a layout, simply select it from the list and click Open. The layout will load, applying its saved settings to your current view.
The Open Layout window lets you browse and select layouts from three categories:
Step 2: Creating a Custom Layout in Primavera P6
While Primavera P6 provides several default layouts, creating your own can significantly improve how you view and manage project data. You can tailor layouts to match your workflow — whether you’re tracking cost, updating progress, or focusing on a specific project phase.
For this guide, we’ll walk through how to customize a layout in the Activities view, but the same steps apply to WBS or Project layouts too.
To get started, make adjustments to the current interface. You’ll find layout tools under both the View and Layout menus. These menus offer various options to change columns, groupings, colors, filters, bar styles, and more. While we won’t explore every tool here, we’ll cover two key features: Grouping and Sorting.
- Grouping Activities by WBS
Grouping helps you organize activities into clear bands — often color-coded — making large schedules easier to scan. You can group by fields like Activity Type or Code, but the most common option is WBS (Work Breakdown Structure), which organizes tasks by project phase or discipline.
To group activities:
- Go to Layout > Group and Sort
2. In the Group and Sort window, use the Group By dropdown to select how you want to group. For this example, choose WBS.
3. To customize how each group appears, click in the Font & Color cell beside each WBS level. You can modify:
- Font type and size
- Bold or italic styling
- Text color
- Background color for better visibility
This visual separation makes it easier to distinguish between project phases or work packages at a glance.
2. Sorting Activities Within Groups
Within the same Group and Sort window, you can define how activities are sorted — either within groups or across the entire table.
- Click the Sort button
- Under Field Name, choose the field you want to sort by (e.g., Activity ID, Start Date, Duration)
- Set Sort Order to either Ascending or Descending
- Click OK to apply the sorting rules
Alternatively, you can quickly sort activities by clicking on any column header directly in the table — but keep in mind this applies a temporary sort and doesn’t change the saved layout settings.
Step 3: Adding and Removing Columns in Primavera P6
Customizing which columns appear in your layout is key to seeing the information that matters most. Depending on your workflow — whether you’re resource loading, tracking progress, or reviewing costs — you’ll want different fields displayed.
For example:
- If you’re focused on cost and effort, you’ll need columns like Budgeted Cost, Planned Units, or Resource Name
- If you’re tracking schedule updates, you’ll want fields like Remaining Duration, Percent Complete, or Actual Start
To customize your columns, follow these steps:
- Go to the top menu and select:
Layout > Columns
2. In the Columns window, you’ll see two panels:
- Available Options: A list of all column categories and fields (e.g., Dates, Costs, Resources, Activity Codes)
- Selected Options: Columns that are currently visible in your table
3. To add a column:
- Select a field from Available Options
- Click the right arrow (→) to move it to the Selected list
4. To remove a column:
- Select it from Selected Options
- Click the left arrow (←) to remove it from the view
5. To reorder how columns appear in your table:
- Use the up/down arrows next to the Selected list to move fields up or down
When you’re satisfied with the column layout, click OK. The updated columns will be immediately reflected in your Activities view.
Having the right columns in place makes it easier to stay focused, whether you’re updating progress, preparing reports, or analyzing delays.
Step 4: Adjusting the Timescale in Primavera P6
The Timescale setting controls how time is displayed in your Gantt chart and other views like resource profiles or spreadsheets. Adjusting this lets you zoom in for short-term detail or zoom out for a long-range overview — depending on your project’s complexity and phase.
To change the timescale in the Gantt chart or other display areas:
- Make sure the Gantt Chart, profile, or spreadsheet is visible in your layout (either top or bottom pane).
- Click the Layout Options bar at the top of the view and choose Timescale from the dropdown.

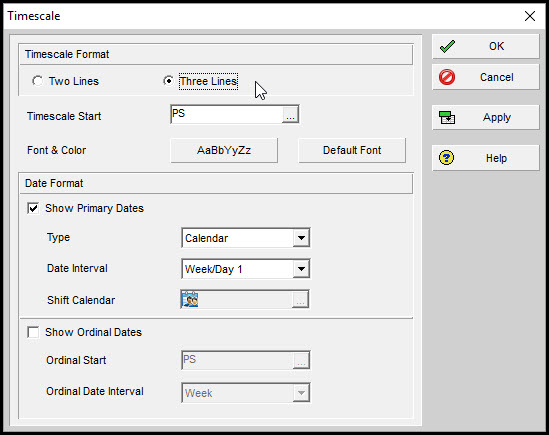
3. In the Timescale dialog box:
- Choose whether to display the timescale as Two Lines or Three Lines — useful for layering units like months, weeks, and days.
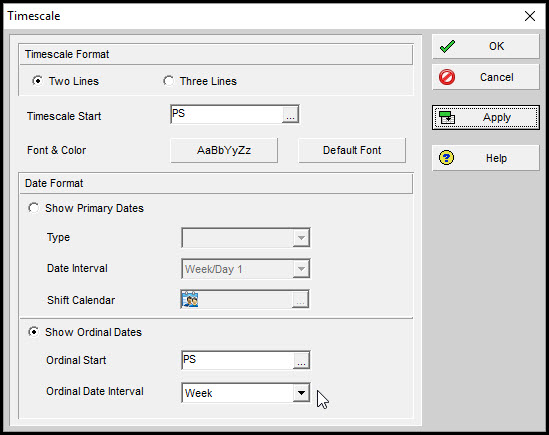
4. In the Timescale Start field, click the calendar icon to set where the timeline should begin. You can choose from standard options or set a custom start date to better align with your project’s timeline.
5. Click Font & Color to adjust how the timescale appears visually. Here, you can:
- Choose the font style and size
- Set color coding for clarity
- Click Default Font to reset everything back to Primavera’s standard appearance

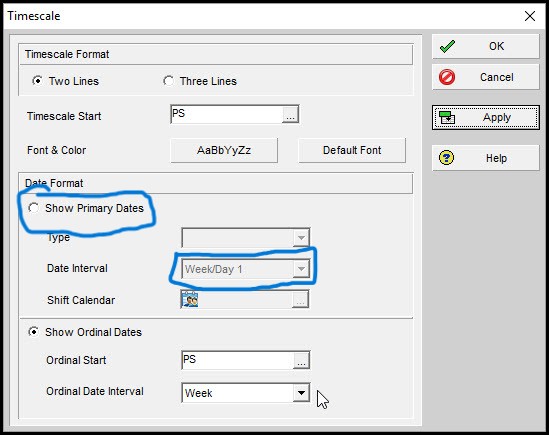
Configuring the Date Format
Primavera gives you two display options for the timescale:
- Show Primary Dates – Displays familiar time units like Day, Week, or Month
- Show Ordinal Dates – Displays sequential numbers based on a defined start date (used in specialized scheduling scenarios)
If you’re using Primary Dates:
- Under Type, choose the format (e.g., Week/Month, Month/Quarter)
- In the Date Interval field, pick how granular you want the view
- If you choose Day/Shift, you can also select a Shift Calendar
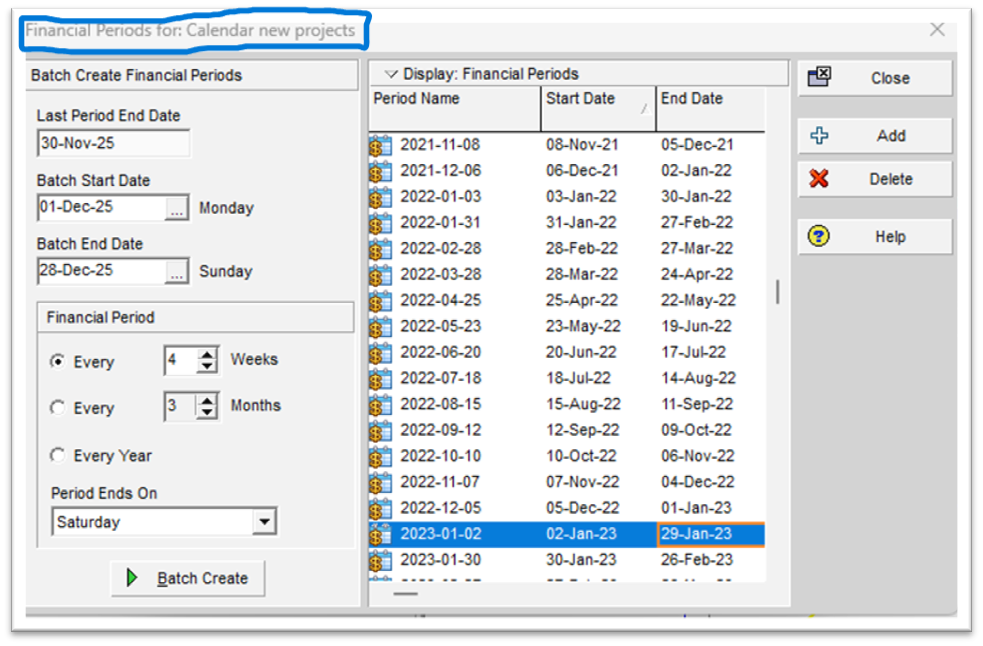
- If you’re using Financial Periods, select the appropriate Financial Calendar
If you’re using Ordinal Dates:
- Set the Ordinal Start date
- Choose the Ordinal Interval (e.g., every 5 days) to control how dates appear
Once all settings are selected:
- Click Apply to preview the changes
- Click OK to confirm and exit the dialog
Adjusting the timescale ensures your schedule is easy to read, whether you’re reporting on monthly milestones or managing daily crew activities. It’s a small change that can make a big difference in project visibility.
Conclusion
Setting up your workspace in Primavera P6 isn’t just about aesthetics — it’s about working smarter. By customizing your columns, creating reusable layouts, and adjusting the timescale, you make the data more readable, the workflow more efficient, and the schedule easier to manage.
Whether you’re preparing reports, reviewing progress, or planning resources, having the right layout can save you hours of frustration. These small adjustments give you more control over how project information is displayed and shared — especially when working across teams or managing complex project structures.
Now that you know how to fine-tune these elements, take a few minutes to build layouts tailored to your specific workflows. Save them, share them, and use them to navigate your schedules with clarity.
Want to Go Deeper?
Watch our in-depth Primavera P6 webinar to learn about this project management tool.