Keeping a project schedule up to date can feel overwhelming, especially when managing a construction project and reporting progress to the owner. But with the right schedule setup, Primavera P6 makes this process much easier.
This method focuses on creating a streamlined schedule that allows contractors to:
- Quickly update actual progress for each reporting period
- Clearly communicate what remains to be done
It’s a common and practical approach used across many construction projects — and it starts with building the right kind of baseline.
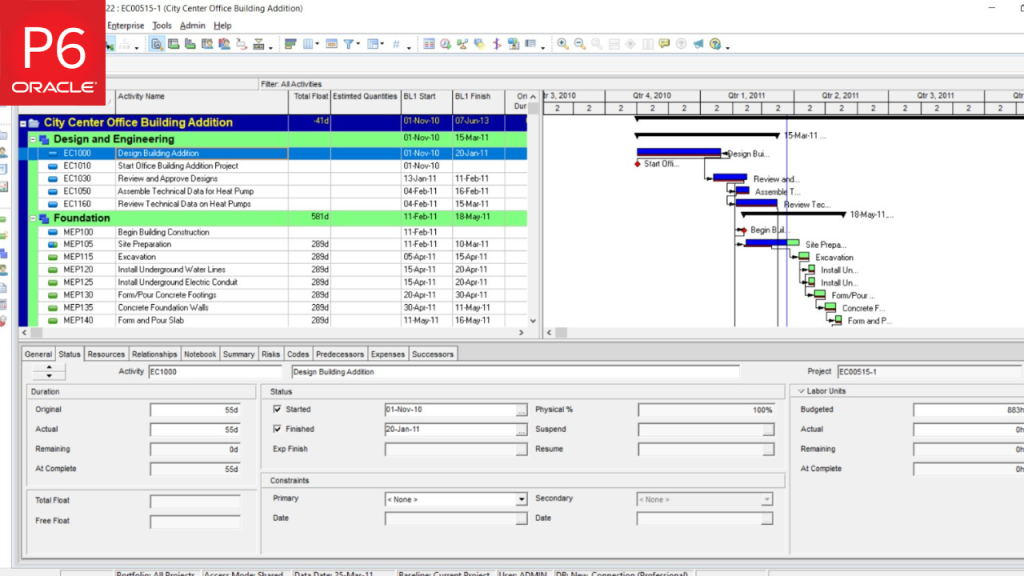
Step 1: Set Up the Baseline Schedule for Progress Tracking
Before anything else, ensure you’ve created a baseline project schedule. If your contract doesn’t require detailed resource or cost loading, you can simplify your schedule with the following Primavera P6 settings:
- Duration Type: Fixed Duration and Units
- Percent Complete Type: Physical
- Activity Type: Set to Task Dependent for most activities, unless the task is a Milestone or Level of Effort (LOE)
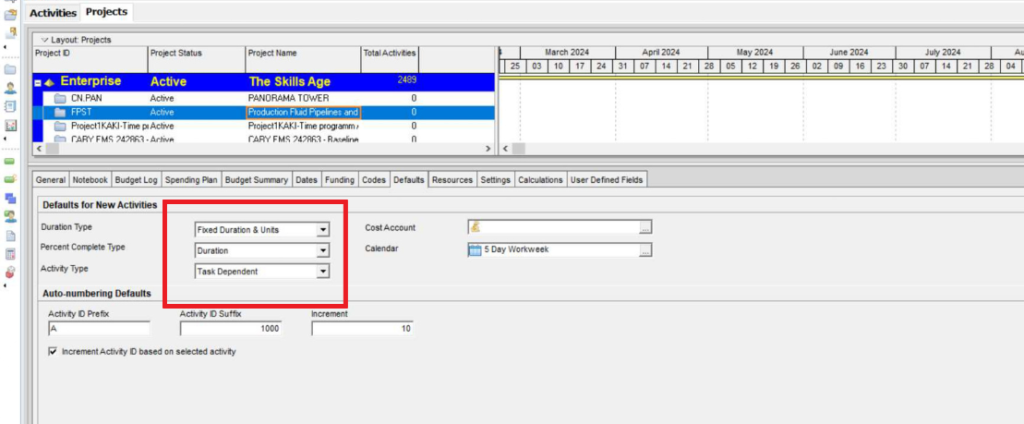
Default “Duration Type”, “Percent Complete Type”, and “Activity Type” Settings
Once the baseline schedule is fully developed and approved, the next step is to prepare it for tracking progress. A simple way to do this is by creating a copy of the accepted baseline and renaming it for use as the first update.
Copy/paste baseline for use as 1 update
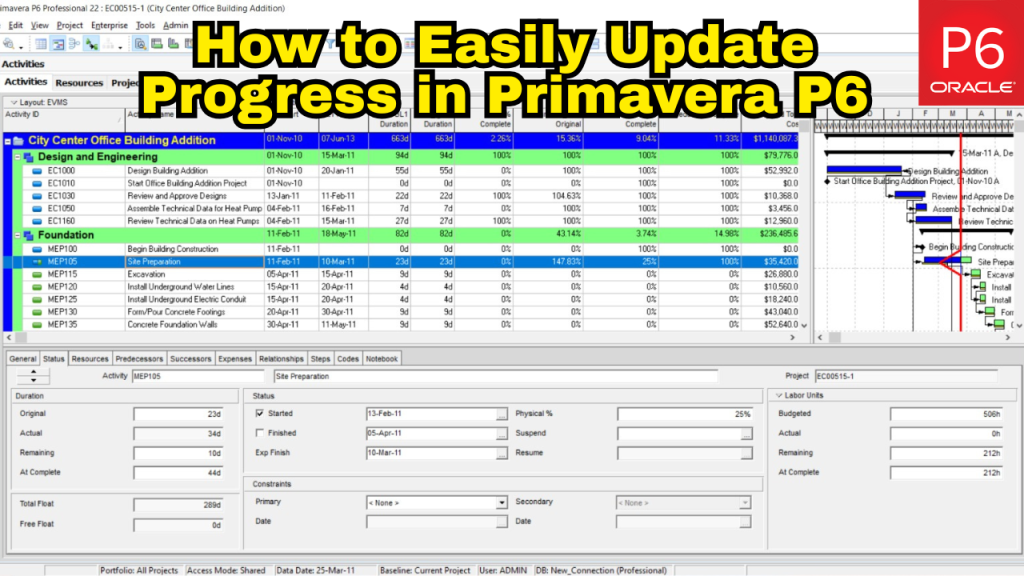
Step 2: Updating the Schedule Without Resource Assignments
When the progress data has been collected — either from the site team or through field observations — it’s time to input this information into the update schedule.
The recommended starting point is to enter all actual start and finish dates for the activities that have been worked on or completed during the update period.

This ensures the schedule reflects real progress before applying percent complete or adjusting remaining durations.
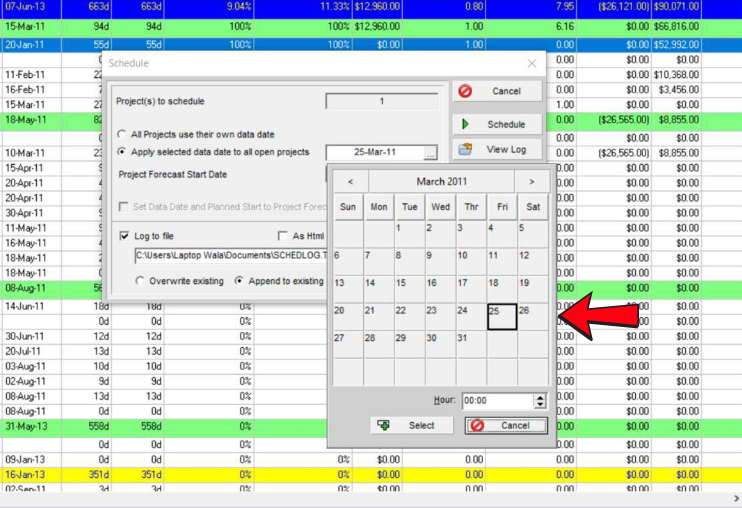
Setting the Data Date to schedule the update
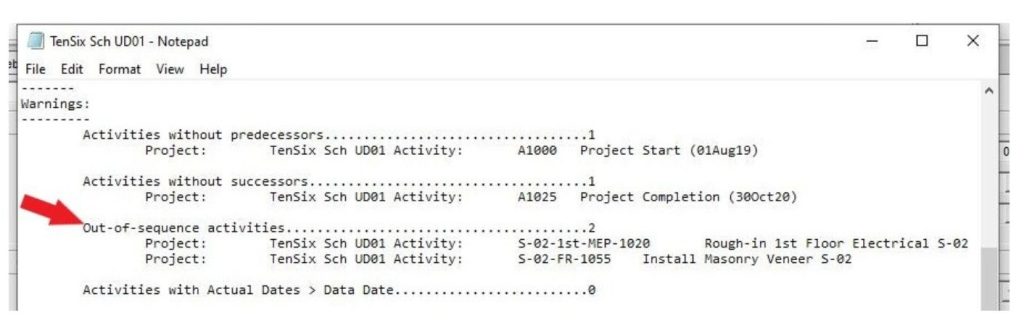
At this stage, it’s a good practice to review and address any activities listed in the Out-of-Sequence (OOS) section of the Primavera P6 schedule log.
Next, update the Remaining Duration (RD) or enter Estimated Finish Dates based on the latest input from the project team.
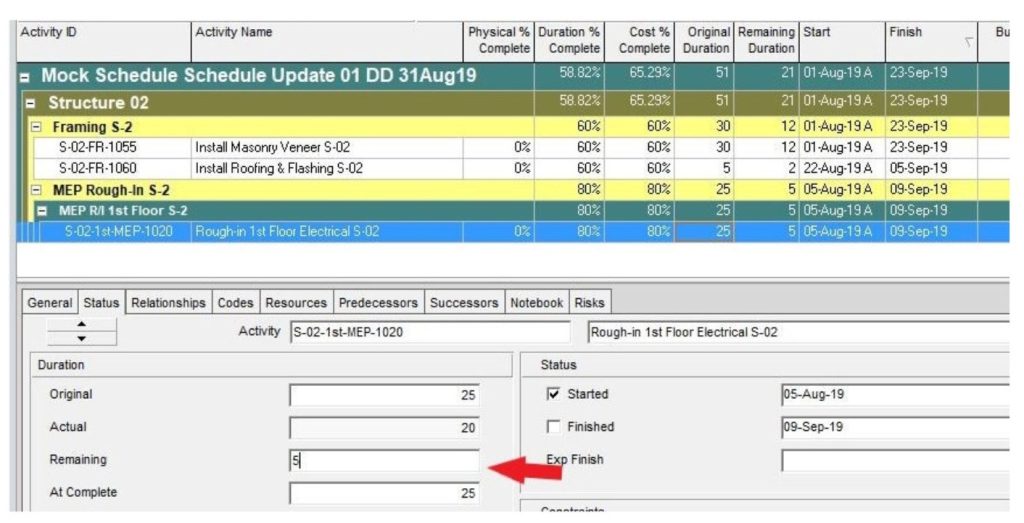
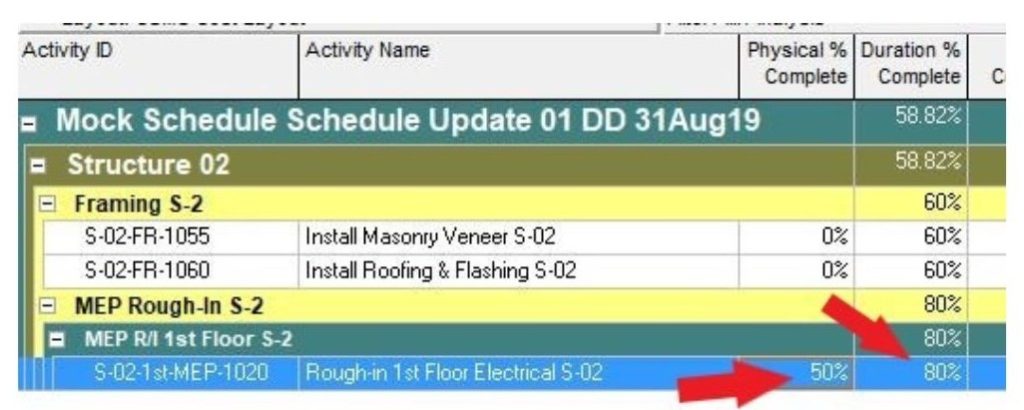
Then, enter the progress in the Physical % Complete field, reflecting the actual work done.
⚠️ Important: Avoid manually adjusting the Duration % Complete field. Primavera P6 calculates this automatically based on the activity’s Original Duration, Actual Duration, and Remaining Duration.
After entering all updates, reschedule the project to apply the changes.
Once rescheduled, the project schedule will reflect the current as-built status, providing an accurate and up-to-date snapshot of progress.
Step 3: Reviewing Progress Against the Plan
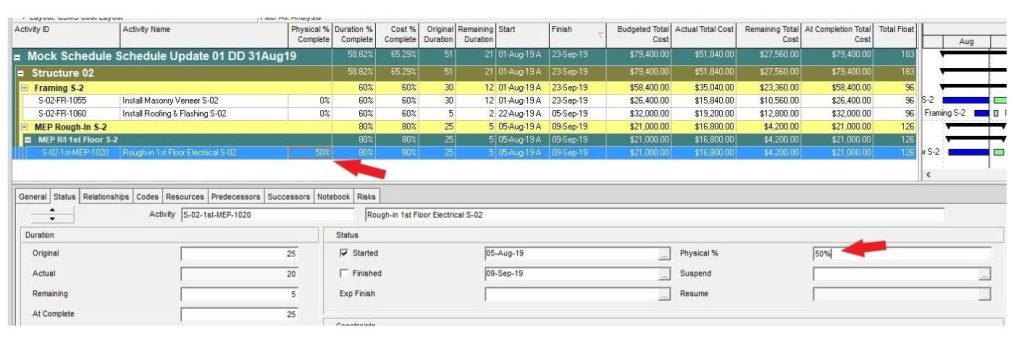
This simplified update method makes it easy to track and compare physical progress against scheduled progress.
For instance, if an activity shows 50% Physical % Complete (based on actual work completed) but 70% Duration % Complete (based on remaining duration or an estimated finish date), it indicates that the production rate is behind plan. This insight can be used to take timely corrective actions for in-progress activities before delays escalate.
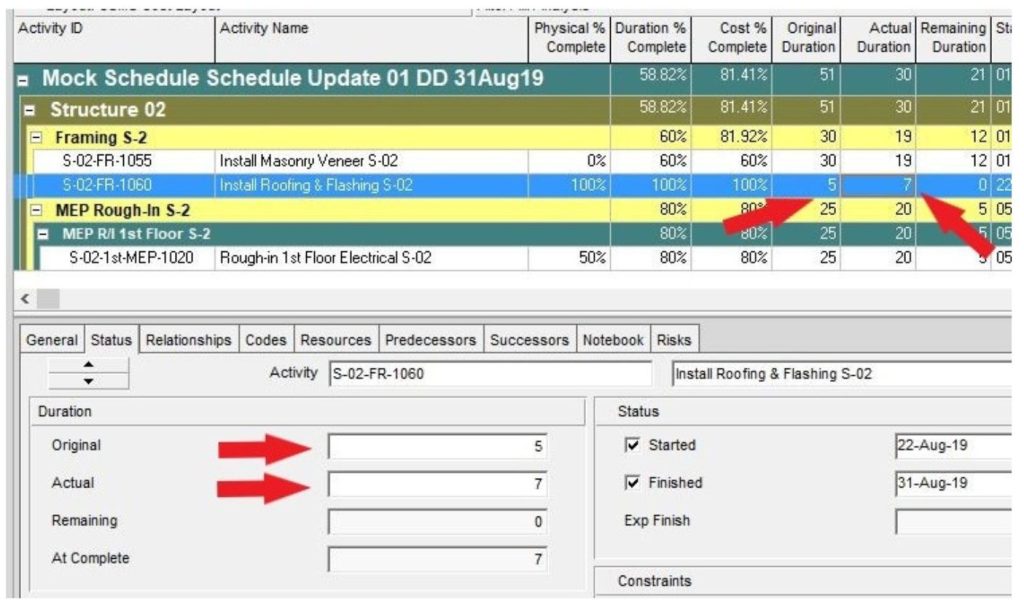
Similarly, completed activities can be evaluated by comparing Original Duration with Actual Duration. A significant increase in actual duration signals lower-than-expected productivity.
Investigating these gaps can help identify the causes and prevent similar delays in current or upcoming tasks handled by the same crew or subcontractor.
Step 4: Working with Resource and Cost-Loaded Schedules
When a project requires Resource and Cost Loading, the update process may vary slightly depending on the level of detail needed.
If the requirement is limited to Lump Sum (LS) cost loading — without tracking labor hours or material quantities — the basic update workflow described above remains effective.
To manage LS costs efficiently:
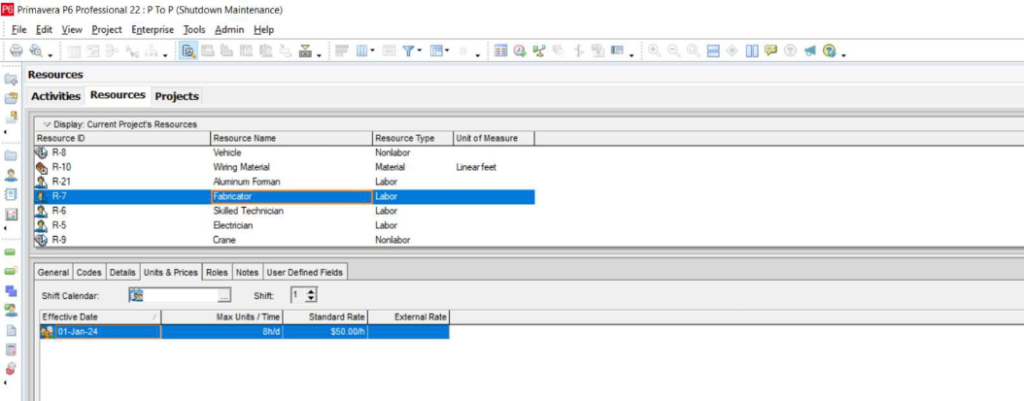
- Create a labor resource for each trade, subcontractor, vendor, or the main contractor
- Assign that single resource to the relevant activity
- Enter the corresponding lump sum cost directly on the activity
Assigning a lump sum cost to a labor resource
For clarity and accountability, it’s recommended to assign only one resource per activity, making it easier to manage responsibility and track performance. In many cases, the USACE LS cost loading method is used — but manual cost entry is also acceptable depending on project requirements.
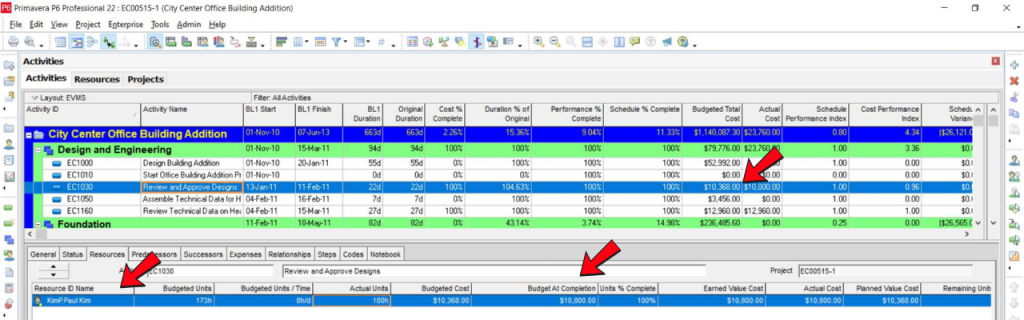
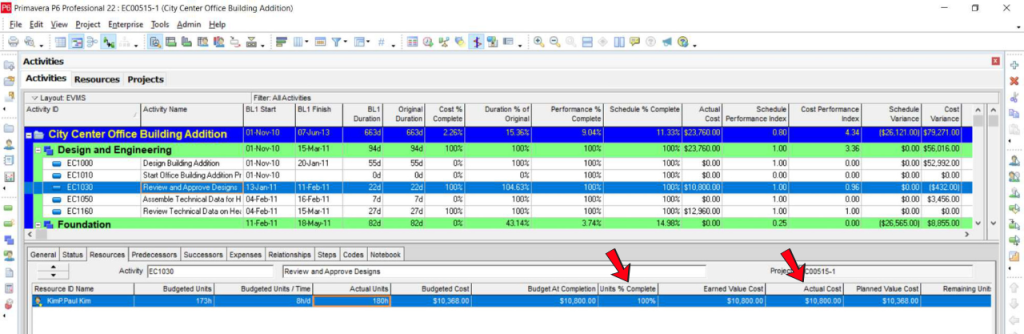
To align Cost % Complete with Physical % Complete, the Actual Total Cost is manually entered during the update. This ensures that invoicing reflects only the work that has been physically completed. Afterward, it’s important to verify that the Remaining Cost and At Completion Budgeted Cost values are accurate.
However, if the project requires resource and cost loading based on hourly units, material quantities, or equipment usage, this simplified approach will not apply. In such cases, updates require more complex configurations — including adjustments to resource settings and task types — which fall outside the scope of this guide.
Learn How to Check EPC Project Schedule Baseline on
Final Thoughts
This method offers a straightforward and practical approach to updating progress in Primavera P6, especially when resource and cost tracking requirements are minimal. By focusing on physical progress, actual dates, and simple cost input, teams can maintain an accurate and actionable schedule throughout the project lifecycle.
The key is to build the schedule in a way that supports easy updates while still providing the owner and project team with the insights they need to track and manage performance effectively.
Want to learn more?
Join our upcoming live webinar where we’ll walk you through real-world Primavera P6 workflows, pro tips, and common pitfalls to avoid.